Upcycle - Developer Guide
Table of contents
- Introduction
- Setup the environment
- Design
3.1. Duke
3.2. Command component
3.3. User component
3.4. Item component
3.5. Transaction component
3.6. Ui component
3.7. Storage component - Implementation
4.1. User-related features
4.2. Item-related features
4.3. Transaction-related features
4.4. Help command
4.5. Exit command - Product Scope
5.1. Target user profile
5.2. Value proposition - User stories
- Non-functional requirements
- Glossary
- Instructions for manual testing
Acknowledgements
This project is based on the skeleton code and documents of SE-EDU AddressBook Level-3
1. Introduction
The goal of Upcycle is to create a perfect desktop app dedicated to managing rental businesses. The target audiences are businesses that require dealing with tons of data. It is developed for rental business managers, who can type fast to efficiently keep track of all of their customers, items, and transactions via a Command Line Interface. The aim of this guide is to help readers understand how the different components of Upcycle are implemented and integrated to create a functional and efficient system. The guide serves to help developers understand the architecture of Upcycle.
2. Setup the environment
Step 1: JDK 11 and IntelliJ are recommended
Step 2: Fork our repo and clone the fork to your local computer.
Step 3: Set up the JDK:
- From the main menu, select File > Project Structure > Project Settings > Project > Project SDK
- If
JDK 11is already defined in Intellij IDEA, select it and clickApply - If
JDK 11is not defined, select Add SDK > Download JDK, choose the necessary JDK (JDK 11) and click Download, then clickApply
Step 4: Go to File > Open, locate and open the cloned repository.
Step 5: Verify the setup:
- Run
Duke.main()and try some commands. - Run the JUnit tests in
src/test/java/seedu.duke
3. Design
This section describes the architecture design of Upcycle with its components, and UML diagrams are used to support.
The overall architecture loosely follows the following diagram:
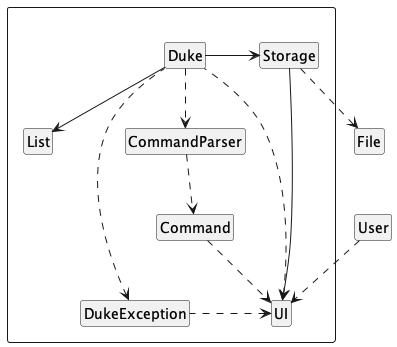
A few things to note about the overall architecture:
- The UI and CommandParser class are helper classes and therefore only have dependencies and not associations
- The Exception, List and Storage components showed above are simplified representations. In reality:
- There are close to 20 created exceptions that extend the base DukeException class
- For List, there are 3 specific lists we work with: UserList, ItemList and StorageList
- Similarly, for Storage, 3 Storage classes that correspond to the lists are: ItemStorage, ItemList and StorageList.
- All classes have some dependency on the Exception class, which we exclude for simplicity since the actual exceptions are handled in Duke
Knowing the overall architecture of the application, we cover the specifics below.
3.1. Duke
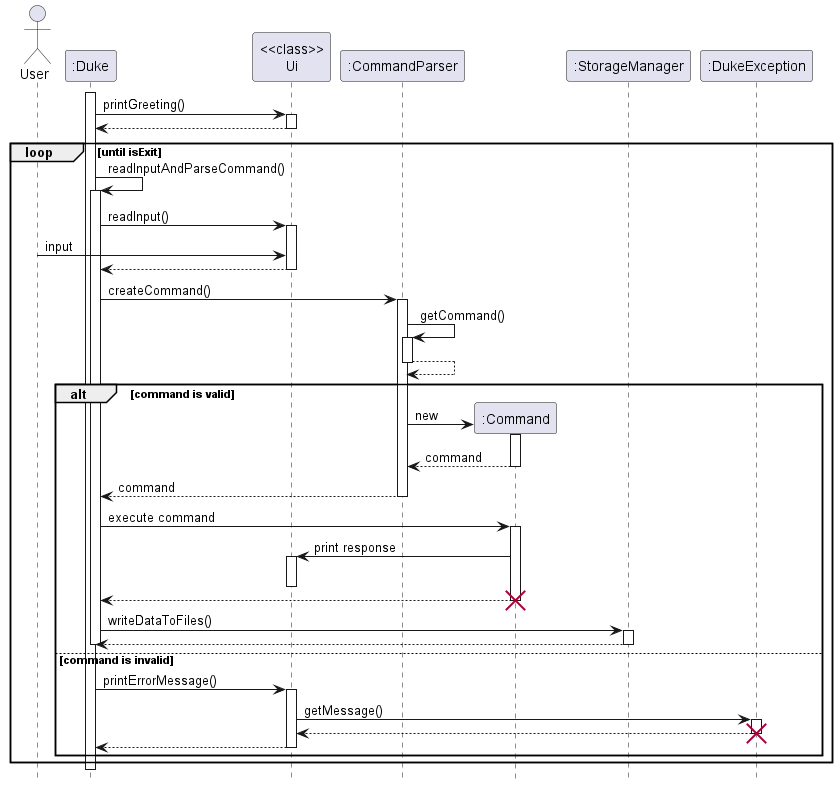
Duke is the main class where Upcycle will run. Upon running it, Duke checks if there is any data corruption in the data files first, then if there is an error in the data files, it calls Ui to print the error and ask if the user wants to force reset his/her data. If yes, all data will be deleted, if no, the user has to edit it until there is no error. If there is no error in the data files, Duke calls the Ui class to greet the user, as well as the Storage class to load any existing data into the system. Afterward, it repeatedly takes in user commands until the exit command is inputted by the user. Any user input is read by the Ui, returned to Duke, and sent to the CommandParser class to be parsed. If the command is valid, it is sent to the Command class to be processed and sent back to Duke to be executed. Valid responses are sent to the Ui to be displayed to the user, and the data is stored in Storage. If not, an appropriate error is displayed instead.
The following diagram demonstrates how Duke runs without data corruption in the files:
3.2. Command component
From the above, it is quite clear that the Command component is important as it governs execution of behaviors depending on user input.
For our components, we try to be consistent by having an interface for classes that acts as a ‘contract’ to tell us what we can do with a class
We therefore have a CommandInterface that is implemented by an abstract class Command, which is the base class for all commands
Below, we show a simplified class diagram of how our Command classes are designed
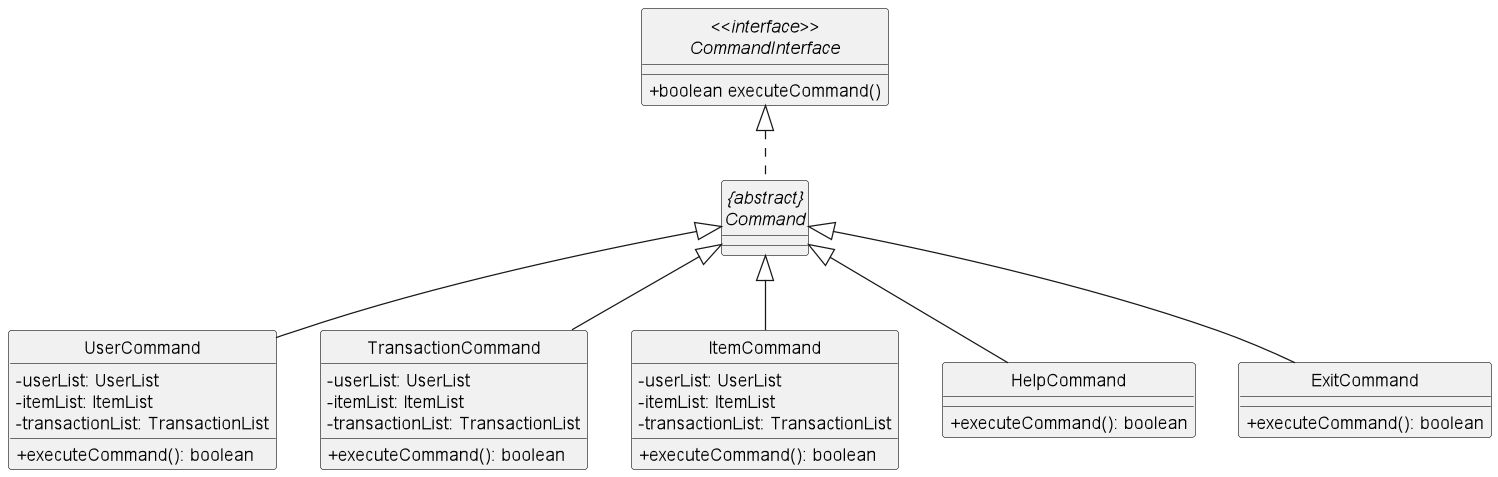
A few things to take note are:
UserCommand,TransactionCommandandItemCommandare simplified here they comprise quite a number of classes- In general, each related has a
Add,Remove,List,View,Updatecommand - For example, the ItemCommand actually comprises
AddItemCommand,ListItemCommand,ViewItemCommand,UpdateItemCommandandDeleteItemand will have other commands in the future. - Since
Comamndis abstract, each subclass will have its own implementation ofexecuteCommand executeCommandwill either return aBooleanvalue or thrown an Exception- The
Booleanreturned value represents if the executing command is the last executed command(such as if a user exits the program) executeCommandfollows the delegation pattern. It receivesUserList,ItemListandTransactionListwhich it delegates work to.
3.3. User component
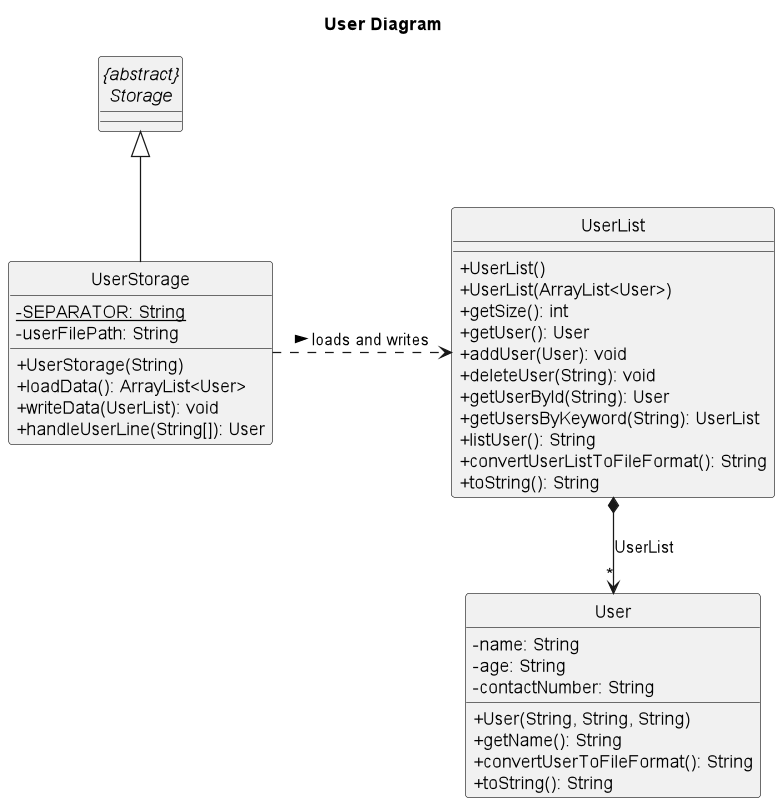
The class diagram below shows how User-related classes interact with each other. User object contains name, age, contactNumber attributes. Users are stored in UserList, which will be loaded and written on the file by UserStorage (inherits from Storage) whenever a command is executed successfully.
All user-related commands operate mainly on a list of users (userList:UserList).
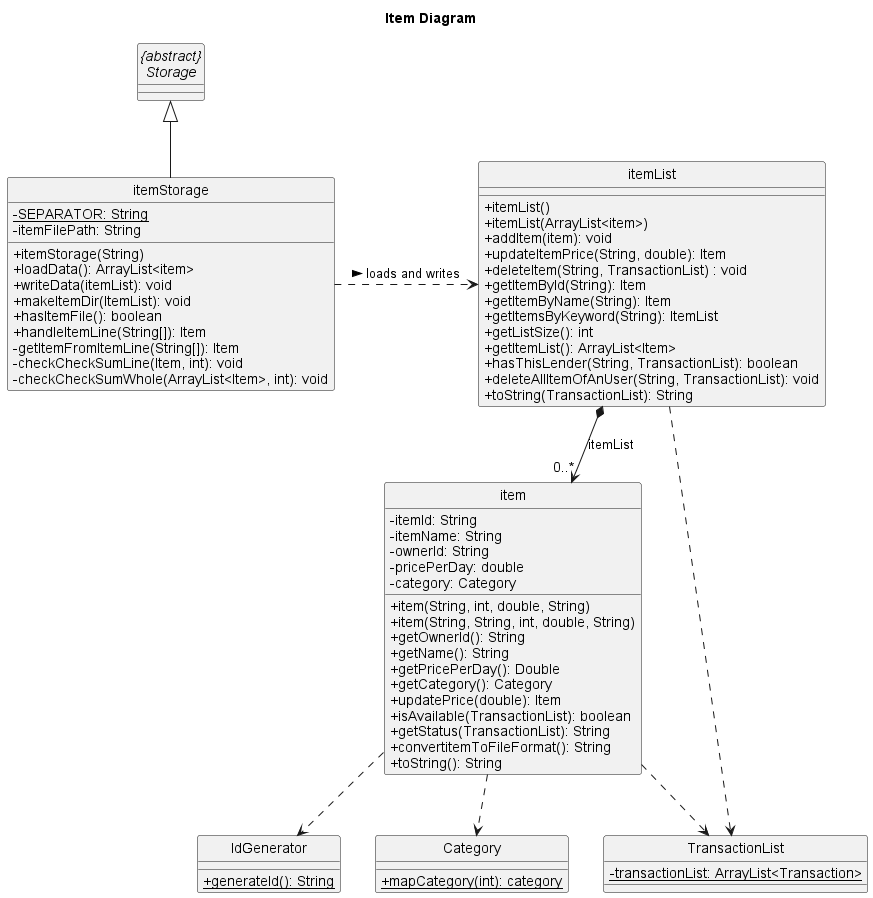
3.4. Item component
The Class diagram below shows how Item-related classes interact with each other. Item object contains itemId, itemName, ownerId, pricePerDay and category
attributes. Among those, itemId is created by IdGenerator’s static method to create a unique id for each item (To allow for duplicate items), and category is created by Category’s method to map the item to its specific category.
Items are stored in itemList, which will be loaded and written on the file by itemStorage (inherits from Item) whenever a command is executed successfully. All item-related
commands operate mainly on a list of items (itemList:ItemList).
Both item and itemList classes have methods that depend on TransactionList as well for cross-checking of information between the classes.
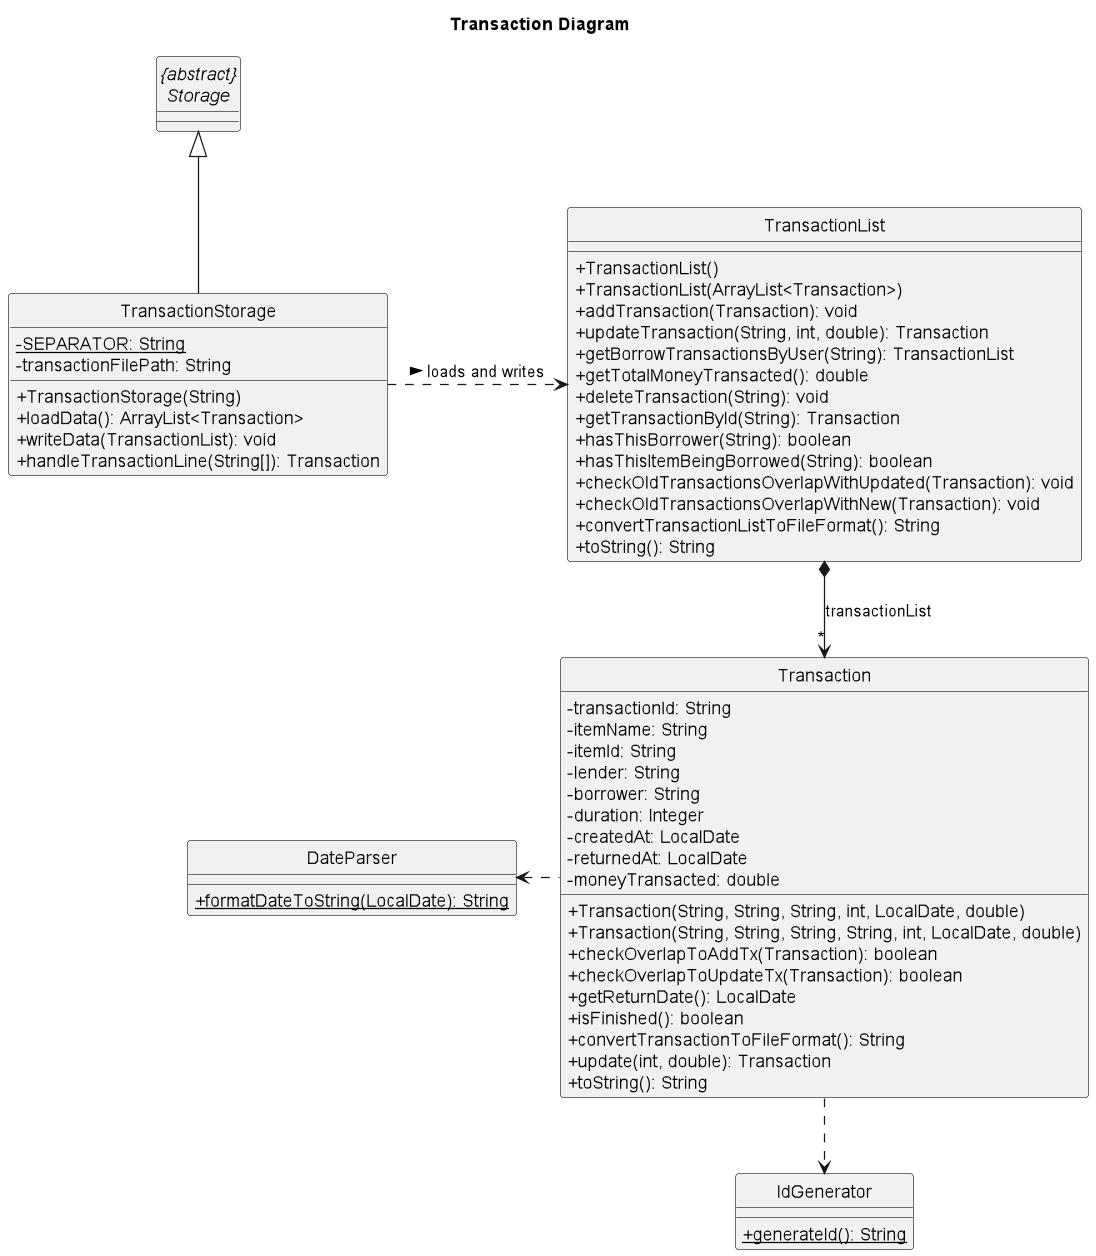
3.5. Transaction component
The Class diagram below shows how Transaction-related classes interact with each other and their components. Transaction object contains transactionId, itemName, itemId, borrower, duration, createdAt, returnedAt and moneyTransacted
attributes. Among those, transactionId is created by IdGenerator’s static method and dates are formatted by DateParser. Transactions are stored in TransactionList, which will be loaded and written on the file by TransactionStorage
(inherits from Storage) whenever a command is executed successfully. All transaction-related commands operate mainly on a list of transaction (transactionList:TransactionList)
Some unimportant methods are ignored in this diagram, for example, some “get” methods, and some in Storage class
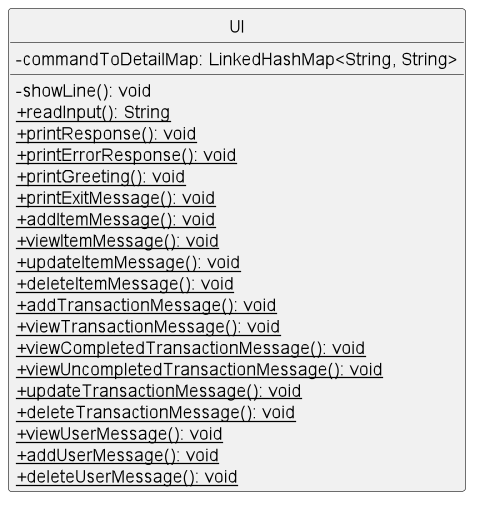
3.6. Ui component
The UI component handles anything related to user interaction.
Primarily, it consists of two main operations: reading user inputs and printing responses to the user.
For reading inputs, there is simply UI::readInput
For printing responses, there are UI::printResponse and UI::printErrorResponse
Further methods for printing specific responses that correspond to a user’s behavior are defined for convenience.
The design of the UI component is to simply act as a helper class i.e. one consists mainly of static methods that are called directly from the class. This makes sense as the UI class should not to be instantiated and is not inherited by other classes.
Below, we detail the design of the UI class with a class diagram
3.7. Storage component
Upcycle has three separate Storage classes, dedicated for three types of objects: UserStorage, ItemStorage, and TransactionStorage. All of these inherit from an abstract class called Storage.
Moreover, we also StorageManager class as a bridge between main class Duke and other storage, which handles data corruption in the files, writes data/loads data from/to all three lists.
The following diagrams show more details about Storage classes (some unimportant methods are removed from the diagram):
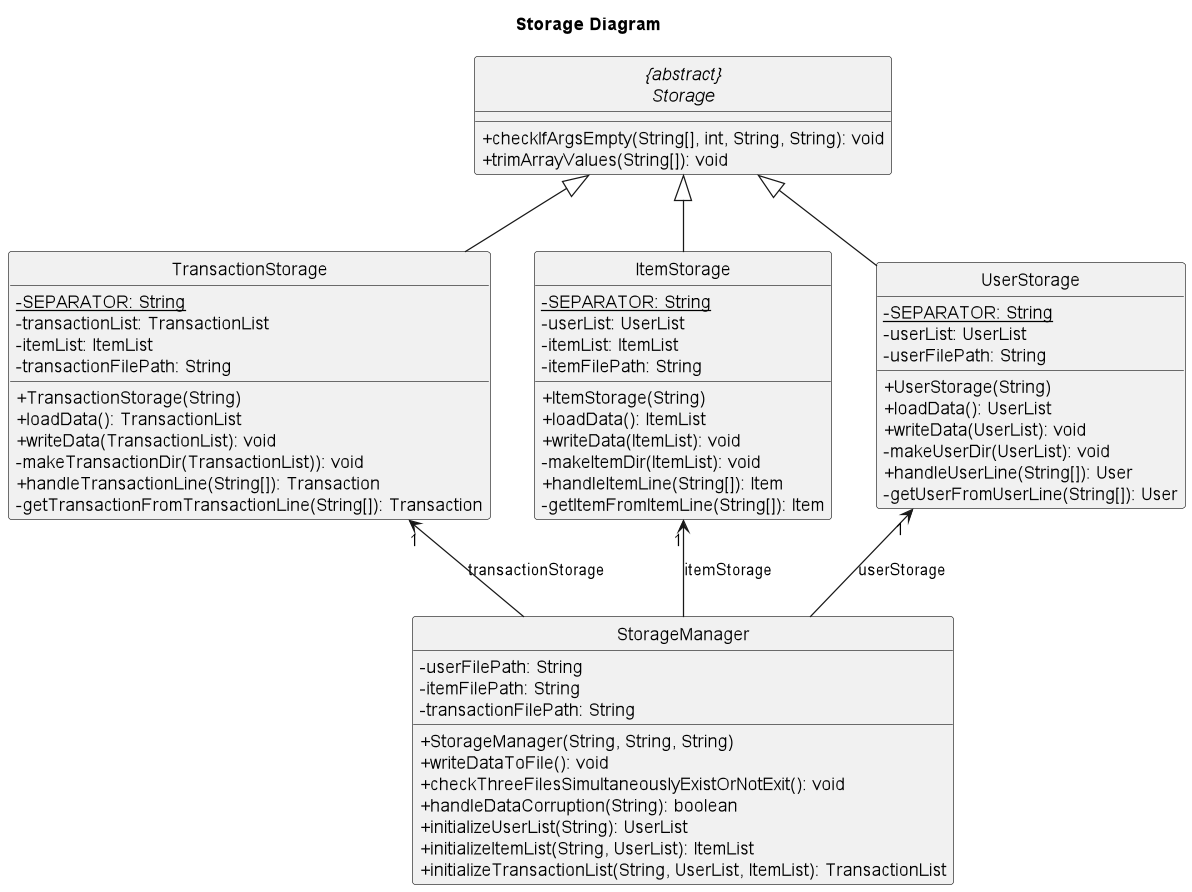
Upcycle stores the user’s data, including the user list, item list, and transaction list in three files user.txt, item.txt, and transaction.txt, respectively.
The data will be loaded when running the program and will be written to the files after each operation. These files can be found in data folder in the same directory as the folder containing project root.
If Duke detects a change that potentially causes errors in the files, it will print out where the error is and its reason. It also asks if user wants to try to re-edit it or let Duke force reset all list.
4. Implementation
This section describes how features are implemented, where readers can get insight into the mechanisms of them with step-by-step descriptions and UML diagrams.
Note:
executeCommand()method of every command returns a boolean. OnlyExitCommandreturnstruesince it informs Duke that this is the last command to exit.
4.1. User-related Features
4.1.1. Add a user
This feature allows user to add a new user to their list and upon successful adding, a confirmation response about the new user will be sent from Ui to user
Given below is an example usage scenario and how the command mechanism behaves at each step.
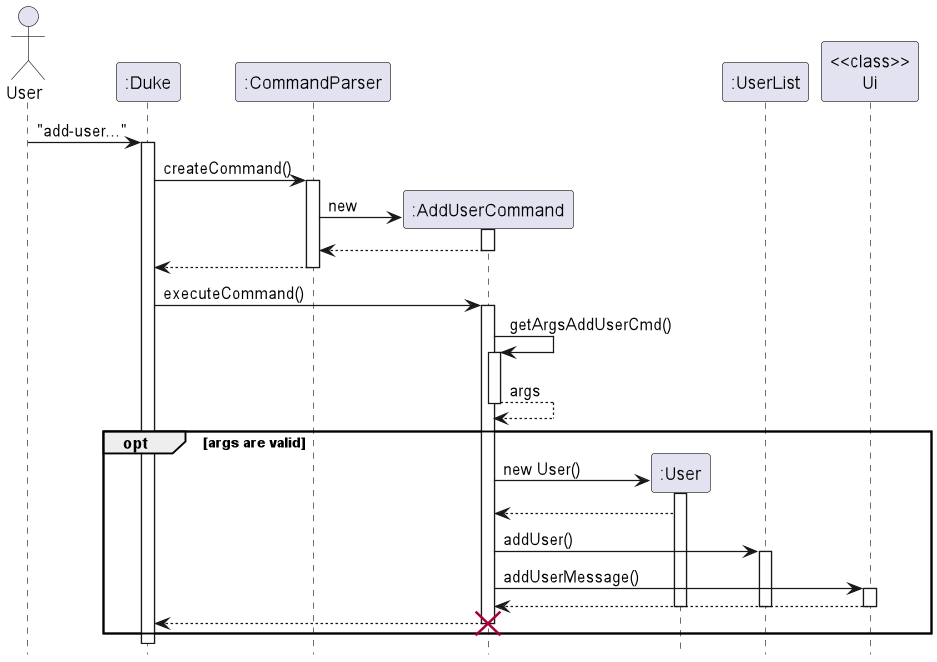
Step 1: The user types in the command add-user /n [NAME] /a [AGE] /c [CONTACT] in the command line. The CommandParser class checks if the command is valid through the createCommand() method, and sends the input to the AddUserCommand class to be processed.
Step 2: The AddUserCommand command checks if the delimiters (‘n’, ‘a’, ‘c’) are present in the user input through the getArgsAddUserCmd() method. If not present, an exception will be thrown. The command also checks whether the input name, age and contact are valid through userList.checkValidArgsForUser(args); methods. An exception will also be thrown if the final argument does not satisfy the requirements (duplicate name, wrong range or format age, wrong contact length,…).
Step 3: If all arguments are valid, then it creates a new User(arg[0], Integer.parseInt(args[1]), args[2]) with args[0] is username, args[2] is age, and args[3] is contact number
Step 4: After adding the new user, a message will be displayed to the user via Ui.addUserMessage() method which shows the new user’s details and the size of userList.
The following sequence diagram shows how the add user operation works:
4.1.2. Remove a user
This feature allows user to remove a user to their list and upon successful removing, a confirmation response about the deleted user will be sent from Ui to user
Given below is an example usage scenario and how the command mechanism behaves at each step.
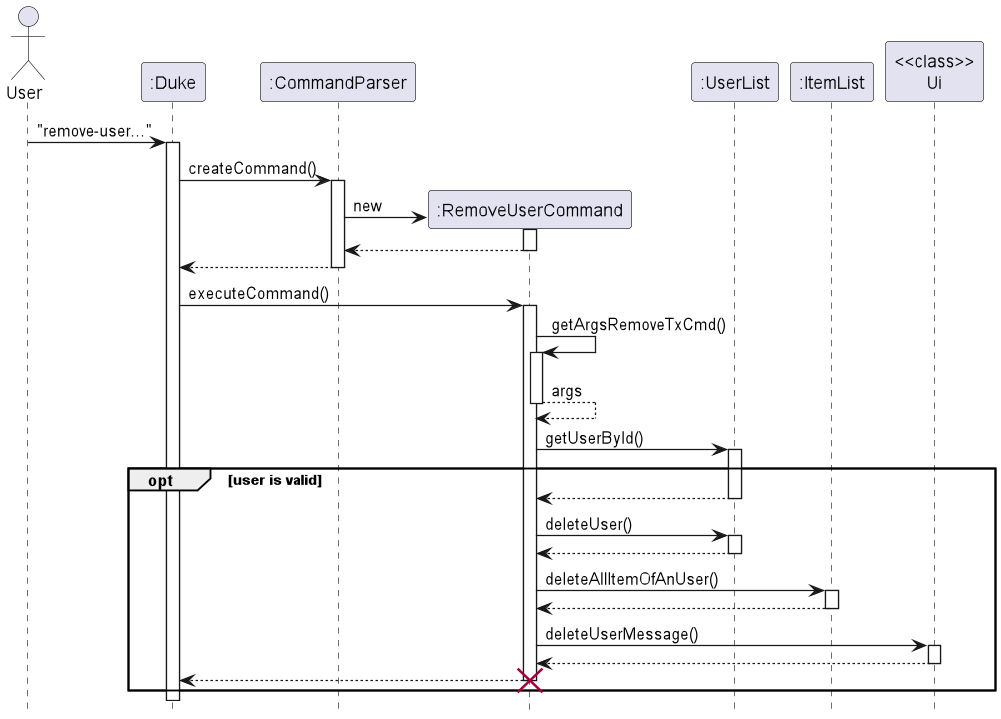
Step 1: The user types in the command remove-user \u [USERNAME] in the command line. The CommandParser class checks if the command is valid through the createCommand() method, and sends the input to the RemoveUserCommand class to be processed.
Step 2: The RemoveUserCommand command checks if the delimiter (‘u’) is present in the user input through the getArgsRemoveUserCmd() method. If not present, an exception will be thrown. The command also checks whether the input’s final argument is valid
(user can be deleted or not) by checking whether that user is currently borrowing or lending any item via canDeleteUser(), isBorrowing() and isLending() methods. An exception will also be thrown if the final argument does not satisfy the requirements (user not found, user is borrowing/lending).
Step 3: If all arguments are valid, then it finds and deletes the user in the userList by his/her name, which is unique. And all of his/her items stored in itemList are also deleted:
userList.deleteUser(username);
itemList.deleteAllItemOfAnUser(username, transactionList)
Step 4: After deleting a user, a message will be displayed to the user via Ui.deleteUserMessage() method which shows the deleted user’s details and the size of userList.
The following sequence diagram shows how the remove user operation works:
4.1.3. List users
This feature allows the user to view details of all users in the user list
Given below is an example usage scenario and how the command mechanism behaves at each step.
Step 1: The user types in the command in the command line. The CommandParser class checks if the command is valid through the createCommand() method, and either sends an exception, or send the input to the ListUsersCommand class to be processed.
Step 2: In ListUserCommand::exeucteCommand work is delegated UserList::toString() to obtain a string representation of all users in the user list
Step 3: The string representation is forwarded to UI::printResponse to show it to the user
Step 4: Lastly, executeCommand returns false to indicate that this is a non-terminating command
The following sequence diagram shows how the view user operation works:

4.1.4. View a user
This feature allows the user to view a specific user in the user list. Upon successfully sending the command, the Ui will display the details of the searched user
Given below is an example usage scenario and how the command mechanism behaves at each step.
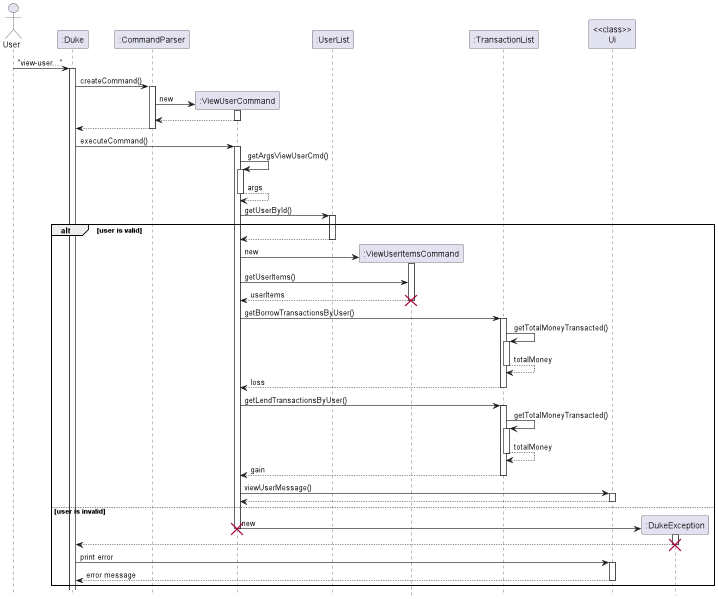
Step 1: The user types in the command in the command line. The CommandParser class checks if the command is valid through the createCommand() method, and either sends an exception, or send the input to the ViewUserCommand class to be processed.
Step 2: The ViewUserCommand command checks if the delimiters (‘u’) is present in the user input through the getArgsViewUserCmd() method. If not present, an exception will be thrown. The command also checks whether the input’s final argument is valid (user can be found or not) by checking whether that user is currently in the user list via the isValidUser method. An exception will also be thrown if the final argument does not satisfy the requirements (user not found).
Step 3: If all arguments are valid, then it finds the user in the userList by his/her name, which is unique:
userList.getUserById(userName);.
It will also find the items belonging to the user (ViewUserItemsCommand.getUserItems), user’s loss (transactionList.getBorrowTransactionsByUser(userName).getTotalMoneyTransacted())
and user’s gain (transactionList.getLendTransactionsByUser(userName).getTotalMoneyTransacted())
Step 4: After finding the user, a message will be displayed to the user via Ui.viewUserMessage() method which show the specified user’s details.
The following sequence diagram shows how the view user operation works:
4.1.5. View a user’s items
This feature is an extension to view user feature. It allows the user to view a user’s items and if the input is correct, a list of items will be sent from the Ui to user
Given below is an example usage scenario and how the command mechanism behaves at each step.
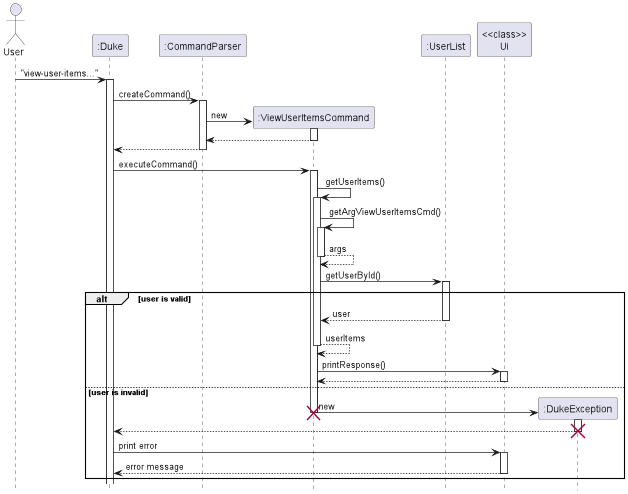
Step 1: The user types in the command in the command line. The CommandParser class checks ig the command is valid through the createCommand() method and either sends an exception or sent the input to ViewUserItemsCommand to be processed.
Step 2: The ViewUserItemsCommand checks if the delimiters (‘u’) are present in the getArgViewUserItemsCmd(). The command checks whether the input’s final argument is valid through isValidUser(). An exception will be thrown if the argument does not satisfy the requirements (user not found/does not exist).
Step 3: If argument is valid, then getUserItems() will return a list of items whose owner’s id equals to the argument.
Step 4: The list of items will then be displayed to the user via Ui.printResponse().
The following sequence diagram shows how the view-user-items operation works:
4.1.6. Find Users by Keyword
This feature allows users to find items through the command
find-user.
Given below is an example usage scenario and how the command mechanism behaves at each step.
Step 1: The user types in the command find-user /u [keyword] in the command line. The CommandParser class checks if the command is valid through the createCommand() method.
Step 2: Duke will receive the FindUserCommand and execute it.
Step 3: FindUserCommand will check for the delimiter “/k”. If it is not present, an exception is thrown. Else the command is executed.
Step 4: The UserList is iterated through to check for Users that match the provided keyword. Matched users are appended to a List which is returned and then printed by Ui.printResponse().
4.1.7. View User Loss
This feature allows users to find user debt by summing all moneyTransacted in all the Transactions in which the User is a Borrower through the command
view-user-debt.
Given below is an example usage scenario and how the command mechanism behaves at each step.
Step 1: The user types in the command view-user-loss /u [username] in the command line. The CommandParser class checks if the command is valid through the createCommand() method.
Step 2: Duke will receive the ViewUserLossCommand and execute it.
Step 3: ViewUserLossCommand will check for the delimiter “/u”. If it is not present, an exception is thrown. Else the command is executed.
Step 4: The UserList is iterated through to find the User with the given [username]. If none exist, a UserNotFoundException is thrown.
Step 5: getBorrowTransactionsByUser(username) is run. The TransactionList is iterated through to find Transactions in which said User is the Borrower. If User is Borrower, the Transaction is added to a new TransactionList, which is then returned.
Step 6: getTotalMoneyTransacted() is run on the new TransactionList. The moneyTransacted in each of the Transactions in the new TransactionList is summed together to give a return value.
Step 7: The total User debt is printed by Ui.printResponse().
The following sequence diagram models the operation: 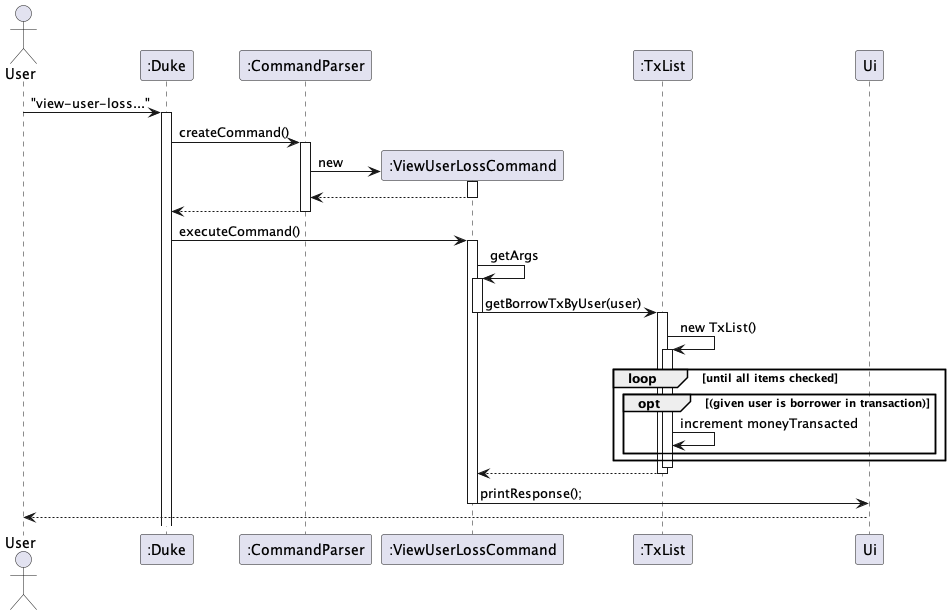
4.1.8. View User Gain
This feature allows users to find user debt by summing all moneyTransacted in all the Transactions in which the User is a Borrower through the command
view-user-debt.
Given below is an example usage scenario and how the command mechanism behaves at each step.
Step 1: The user types in the command view-user-gain /u [username] in the command line. The CommandParser class checks if the command is valid through the createCommand() method.
Step 2: Duke will receive the ViewUserGainCommand and execute it.
Step 3: ViewUserGainCommand will check for the delimiter “/u”. If it is not present, an exception is thrown. Else the command is executed.
Step 4: The UserList is iterated through to find the User with the given username. If none exist, a UserNotFoundException is thrown.
Step 5: getLendTransactionsByUser(username) is run. The TransactionList is iterated through to find Transactions in which said User is the Lender. If User is Lender, the Transaction is added to a new TransactionList, which is then returned.
Step 6: getTotalMoneyTransacted() is run on the new TransactionList. The moneyTransacted in each of the Transactions in the new TransactionList is summed together to give a return value.
Step 7: The total User gain is printed by Ui.printResponse().
The sequence diagram for this operation is nearly identical to that of ViewUserLoss, except that Transactions in which the User is the Lender are used instead.
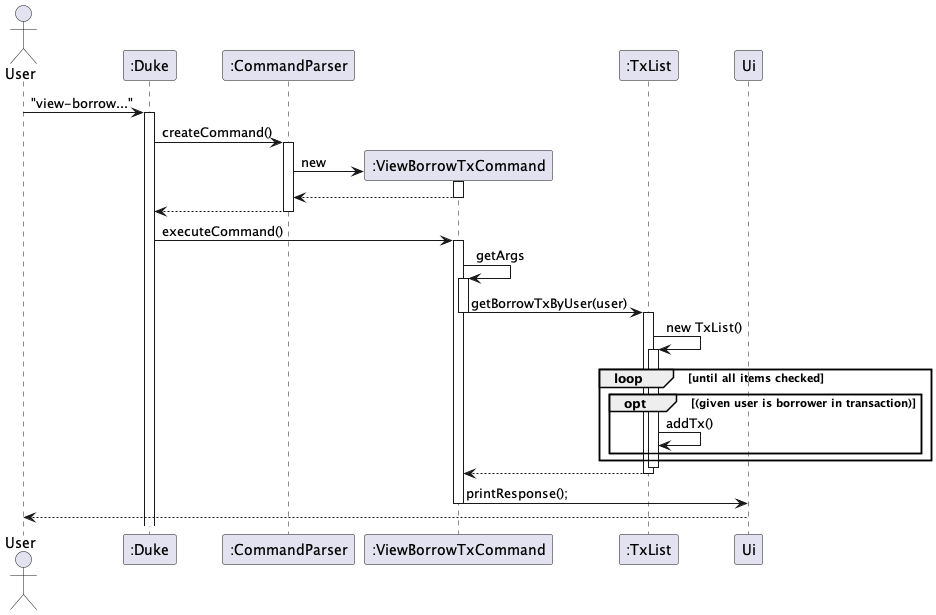
4.1.9 . List Transaction By Borrower/Lender
These features allow the user to list all the Transactions in which a given User is a Borrower/Lender.
Given below is an example usage scenario and how the command mechanism behaves at each step.
Step 1: The user types in the command in the command line. The CommandParser class checks if the command is valid through the createCommand() method, and either throws an exception, or forwards the input to ViewTransactionsByUserCommand class to be processed.
Step 2: ViewBorrowTransactionsByUserCommand::executeCommand or ViewLendTransactionsByUserCommand::executeCommand checks if the delimiters (‘u’) are present in the user input with the getArgs() method. If argument not present, an exception will be thrown.
Step 3: If argument is present, it then checks if the User specified exists/ is valid with ViewBorrowTransactionsByUserCommand::isValidUser or ViewLendTransactionsByUserCommand::isValidUser. A UserNotFoundException is thrown otherwise.
Step 4: If User is found, it then delegates to TransactionList::getBorrowTransactionsByUser or TransactionList::getLendTransactionsByUserwhich finds the transactions in which a given User is Borrower and returns a TransactionList containing all of them.
Step 5: The returned TransactionList printed to the User via Ui.printResponse()
The following sequence diagram models the operation:
4.2. Item-related Features
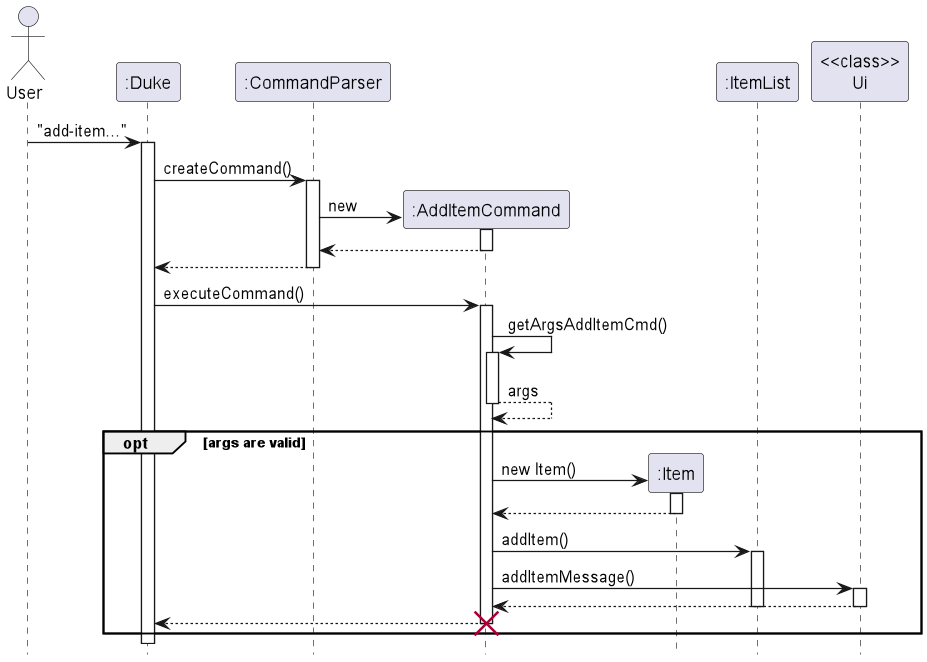
4.2.1. Add an item
This feature allows user to add a new item to their list and upon successful adding, a confirmation response about the new item will be sent from Ui to user
Given below is an example usage scenario and how the command mechanism behaves at each step.
Step 1: The user types in the command add-item /n [NAME] /c [CATEGORY] /p [PRICE] /o [OWNER]. The CommandParser class checks if the command is valid through the createCommand() method, and sends the input to the AddItemCommand to be processed.
Step 2: The AddItemCommand command checks if the delimiters (‘n’, ‘c’, ‘p’, ‘o’) are present in the user input through the getArgsAddItemCmd() method. If not present, an exception will be thrown. The command also checks whether the input’s final argument is valid through itemList.checkValidArgsForItem(userList, args) methods.
An exception will also be thrown if the final argument does not satisfy the requirements (duplicate name of item of the same owner, owner not found, wrong range and format price,…).
Step 3: If all arguments are valid, then it creates a new Item() with args[0] as itemName, args[2] as categoryNumber, and args[3] as price and args[4] as owner’s name
Step 4: After adding the new item, a message will be displayed to the user via Ui.addItemMessage() method which show the new item’s details and the size of itemList.
The following sequence diagram shows how the add item operation works:
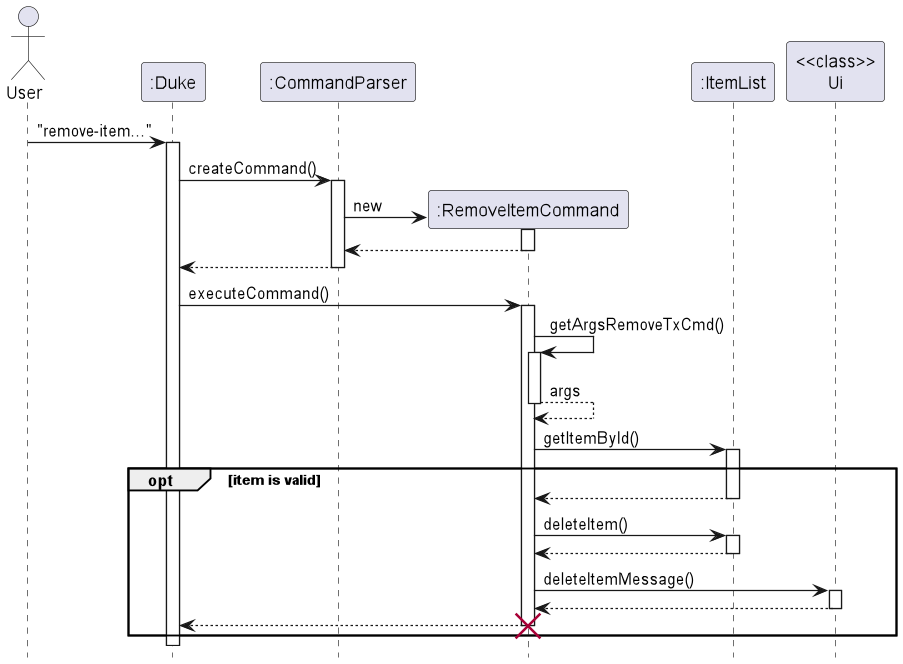
4.2.2 Remove an item
This feature allows user to remove an item to their list and upon successful removing, a confirmation response about the deleted item will be sent from Ui to user
Given below is an example usage scenario and how the command mechanism behaves at each step.
Step 1: The user types in the command remove-item /i [ITEMID]. The CommandParser class checks if the command is valid through the createCommand() method, and sends the input to the RemoveItemCommand to be processed.
Step 2: The RemoveItemCommand command checks if the delimiter (‘i’) is present in the user input through the getArgsRemoveItemCmd() method. If not present, an exception will be thrown. The command also checks whether the input’s final argument is valid (item can be deleted or not) by checking whether that item is available (not in any transaction). An exception will also be thrown if the final argument does not satisfy the requirements (item not found, item is unavailable).
Step 3: If all arguments are valid, then it finds and deletes the item in the itemList by its ID, which is unique. However, finished transactions related to that items will not be deleted since if in the future we implement “get profit” feature then it still counts those finished transactions.
itemList.deleteItem(itemId, transactionList);
Step 4: After deleting an item, a message will be displayed to the user via Ui.deleteItemMessage() method which shows the deleted item’s details and the size of itemList.
The following sequence diagram shows how the remove item operation works:
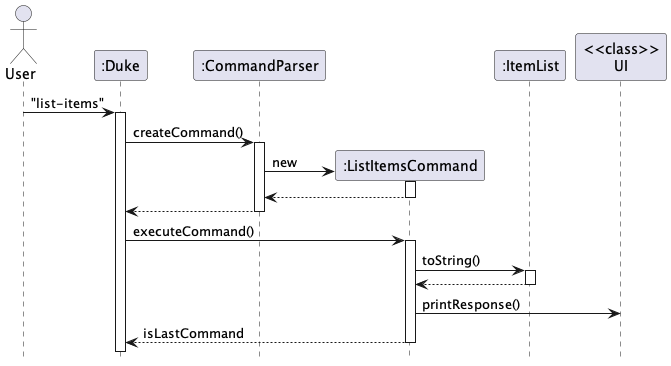
4.2.3. List items
This feature allows the user to view details of all items in the item list
Given below is an example usage scenario and how the command mechanism behaves at each step.
Step 1: The user types in the command in the command line. The CommandParser class checks if the command is valid through the createCommand() method, and either sends an exception, or send the input to the ListItemsCommand class to be processed.
Step 2: In ListItemsComamnd::exeucteCommand work is delegated ItemList::toString() to obtain a string representation of all items in the item list
Step 3: The string representation is forwarded to UI::printResponse to show it to the user
Step 4: Lastly, executeCommand returns false to indicate that this is a non-terminating command
The following sequence diagram shows how the view user operation works:
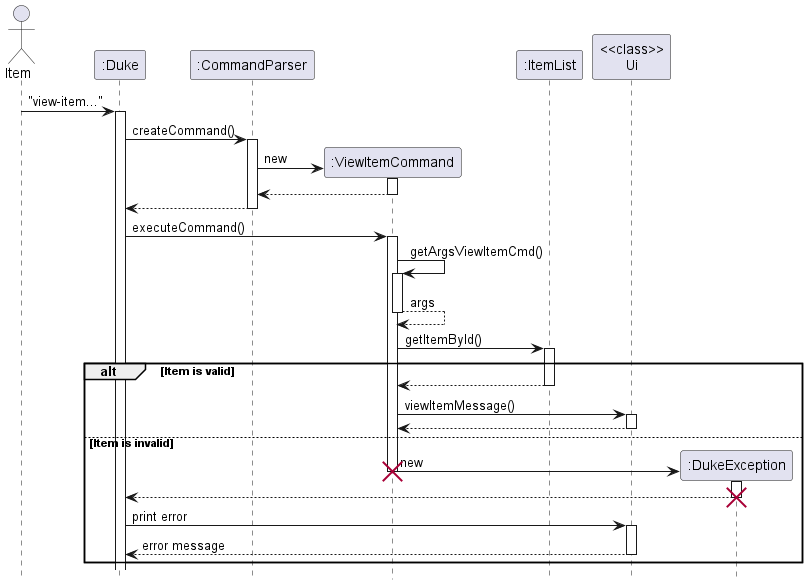
4.2.4. View an item
This feature allows the user to view a specific item in the item list. Upon successfully sending the command, the Ui will display the details of the searched item
Given below is an example usage scenario and how the command mechanism behaves at each step.
Step 1: The user types in the command in the command line. The CommandParser class checks if the command is valid through the createCommand() method, and either sends an exception, or send the input to the ViewItemCommand class to be processed.
Step 2: The ViewItemCommand command checks if the delimiters (‘i’) is present in the user input through the getArgsViewItemCmd() method. If not present, an exception will be thrown. The command also checks whether the input’s final argument is valid (item can be found or not) by checking whether that item is currently in the item list via the isValidItem method. An exception will also be thrown if the final argument does not satisfy the requirements (item not found).
Step 3: If all arguments are valid, then it finds the item in the itemList by itemId, which is unique:
itemList.getItemById(itemId);
Step 4: After finding the user, a message will be displayed to the user via Ui.viewItemMessage() method which show the specified user’s details.
The following sequence diagram shows how the view item operation works:
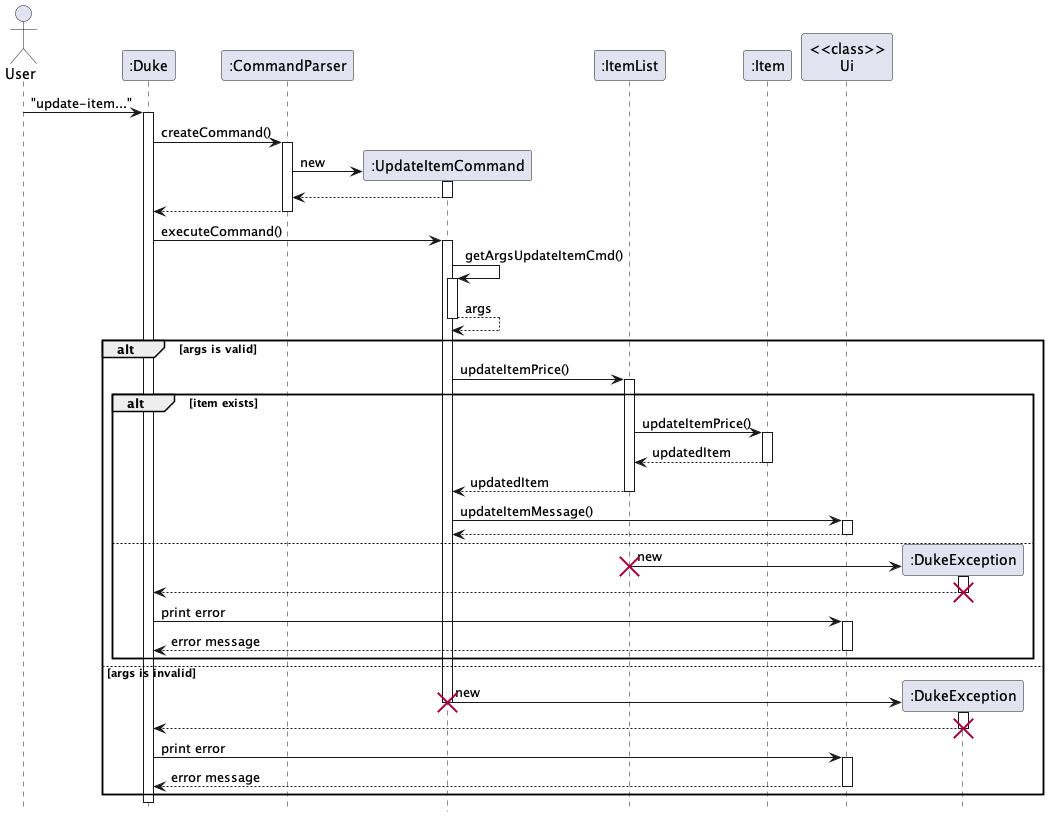
4.2.5. Update an item
This feature allows the user to update a specific item in the item list
Given below is an example usage scenario and how the command mechanism behaves at each step.
Step 1: The user types in the command in the command line. The CommandParser class checks if the command is valid through the createCommand() method, and either throws an exception, or forwards the input to UpdateItemCommand class to be processed.
Step 2: UpdateItemCommand::executeCommand checks if the delimiters (‘i’, ‘p’) is present in the user input with the getArgsViewItemCmd() method. If any arguments are not present, an exception will be thrown.
Step 3: If all commands are present, it then checks if arguments are valid with UpdateItemCommand::areValidArgs . An exception will also be thrown if the final argument does not satisfy the requirements (item not found or price not valid).
Step 4: If all arguments are valid, it then delegates to ItemList::updateItemPrice which finds the item in the itemList by itemId, which is unique and calls Item::updatePrice, which returns an Item with updated price
Step 5: ItemList then updates itself with the latest item and returns
Step 6: Lastly, information about the updated item is printed to the user
The following sequence diagram models the operation:
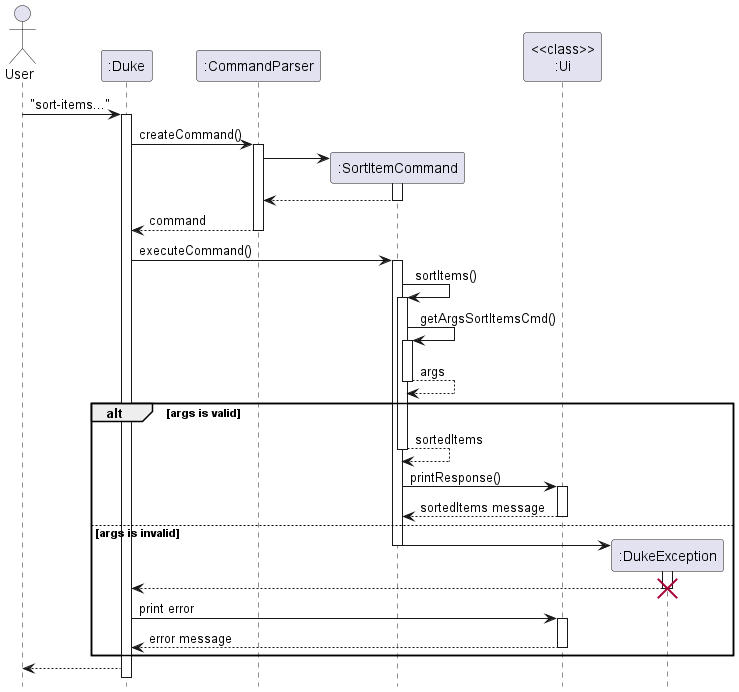
4.2.6. Sorting items
This feature allows user to sort and filter items on their list, and if the input command is correct, a list that is sorted and filtered will be sent from Ui to user
Given below is an example usage scenario and how the command mechanism behaves at each step.
Step 1: The user types in the command in the command line. The CommandParser class checks if the command is valid through the createCommand() method, and either sends an exception or send the input to the SortItemCommand to be processed.
Step 2: The SortItemCommand checks if the delimiters (‘mode’ (optional), ‘min’ (optional), ‘max’ (optional), ‘cat’ (optional)) are present in the user input through the getArgsSortItemsCmd() method. The default sorting mode is low to high if /mode is empty. The command checks whether the input’s final argument is valid through isValidMode(), isValidPrice(), isValidPriceBoundaries and isValidCategoryNumber methods. An exception will also be thrown if the final argument does not satisfy the requirements (incorrect sort format, format price, incorrect price boundaries…)
Step 3: If all arguments are valid, then sortAndFilter() will return a list based on the input arguments.
Step 4: This list of items will then be displayed to the user via Ui.printResponse()
The following sequence diagram shows how the sort items operation works:
4.2.7. List categories
This feature allows users to view categories that can be assigned to items and their index after executing the command
list-categories.
Given below is an example usage scenario and how the command mechanism behaves at each step.
Step 1: The user types in the command list-categories in the command line. The CommandParser class checks if the command is valid through the createCommand() method.
Step 2: Duke will receive the ListCategoriesCommand and execute it.
Step 3: Since there is no parameter to check for list categories command, it will execute directly by calling Ui.printResponse(Category.listCategories()); (Category.listCategories() returns a string represent the category list)
Step 4: The executeCommand() of ExitCommand returns false, so Duke will recognize this command is isLastCommand and exit the while loop and stop the program.
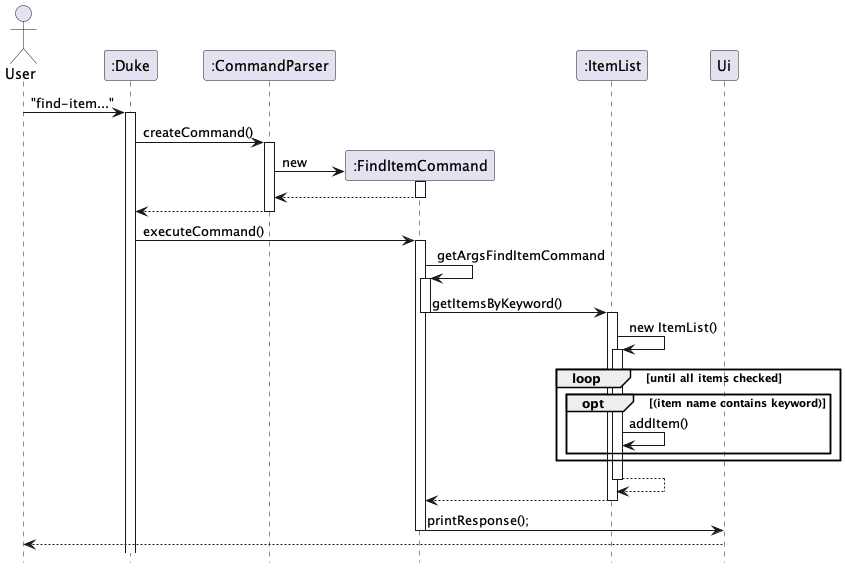
4.2.8. Find Items by Keyword
This feature allows users to find items through the command
find-item.
Given below is an example usage scenario and how the command mechanism behaves at each step.
Step 1: The user types in the command find-items /k [keyword] in the command line. The CommandParser class checks if the command is valid through the createCommand() method.
Step 2: Duke will receive the FindItemsCommand and execute it.
Step 3: FindItemsCommand will check for the delimiter “/k”. If it is not present, an exception is thrown. Else the command is executed.
Step 4: The ItemList is iterated through to check for Items that match the provided keyword. Matched items are appended to a List which is returned and then printed by Ui.printResponse.
The following sequence diagram models the operation:
4.3. Transaction-related Features
4.3.1. Add a Transaction
This feature allows users to add a new transaction to their list and upon successful adding, a confirmation response about the new transaction will be sent from Ui to user
Given below is an example usage scenario and how the command mechanism behaves at each step.
Step 1: The user types in the command add-tx /i [ITEMID]/b [BORROWER] /d [DURATION] /c [createdDate]. The CommandParser class checks if the command is valid through the createCommand() method, and sends the input to the AddTransactionCommand to be processed.
Step 2: The AddTransactionCommand command checks if the delimiters (‘i’, ‘b’, ‘d’, ‘c’) are present in the user input through the getArgsAddItemCmd() method. If not present, an exception will be thrown. The command also checks whether the input’s final argument is valid through checkValidInput(args) methods. An exception will also be thrown if the final argument does not satisfy the requirements (item not found, user not found, duration wrong format, createdDate wrong format…).
Step 3: If all arguments are valid, then it creates a new transaction() with args[0] as itemId, args[2] as borrowerId, and args[3] as duration and args[4] as createdDate
Step 4: After adding the new transaction, a message will be displayed to the user via Ui.addTransactionMessage() method which shows the new transaction’s details and the size of transactionList.
The following sequence diagram shows how the add transaction operation works:

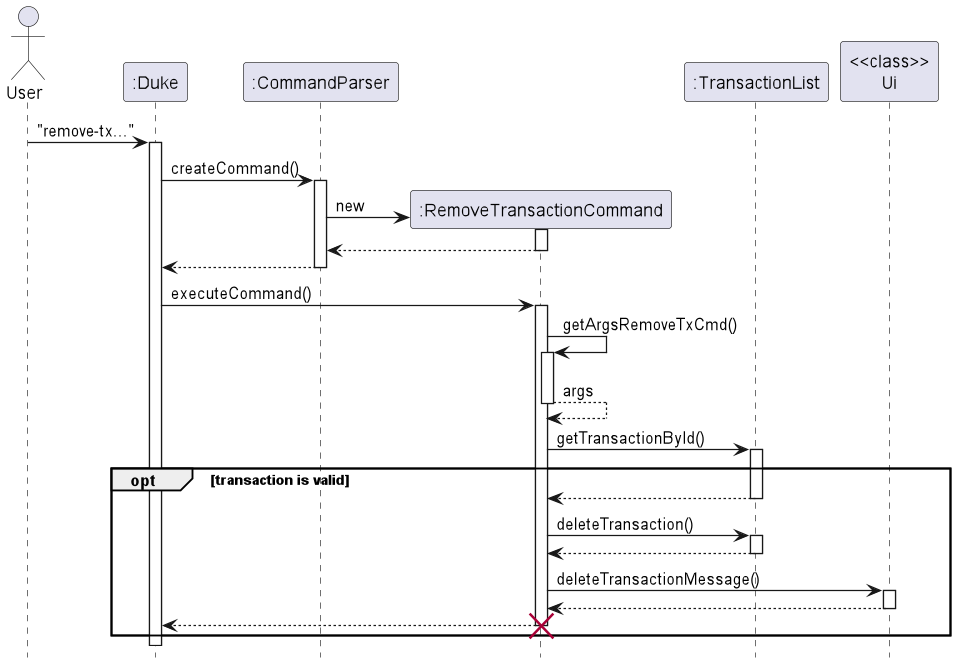
4.3.2. Remove a Transaction
This feature allows user to remove a transaction to their list and upon successful removing, a confirmation response about the deleted transaction will be sent from Ui to user
Given below is an example usage scenario and how the command mechanism behaves at each step.
Step 1: The user types in the command remove-tx /t [TRANSACTIONID]. The CommandParser class checks if the command is valid through the createCommand() method, and either sends an exception, or sends the input to the RemoveTransactionCommand to be processed.
Step 2: The RemoveTransactionCommand command checks if the delimiter (‘t’) is present in the user input through the getArgsRemoveTransactionCmd() method. If not present, an exception will be thrown. The command also checks whether the input’s final argument is valid (transaction can be found). An exception will also be thrown if the final argument does not satisfy the requirements (transaction not found).
Step 3: If all arguments are valid, then it finds and deletes the transaction in the transactionList by its ID, which is unique.
transactionList.deleteTransaction(transactionId);
Step 4: After deleting a transaction, a message will be displayed to the user via Ui.deleteTransactionMessage() method which shows the deleted transaction’s details and the size of transactionList.
The following sequence diagram shows how the remove transaction operation works:
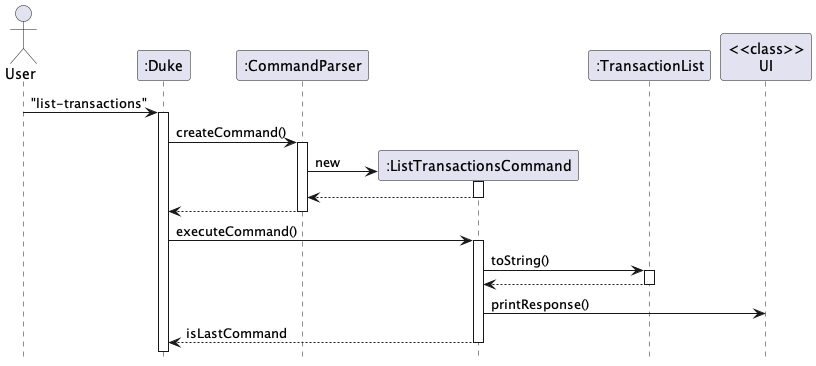
4.3.3. List transactions
This feature allows the user to view details of all transactions
Given below is an example usage scenario and how the command mechanism behaves at each step.
Step 1: The user types in the command in the command line. The CommandParser class checks if the command is valid through the createCommand() method, and either sends an exception, or send the input to the ListTransactionsCommand class to be processed.
Step 2: In ListTransactionsCommand::exeucteCommand work is delegated TransactionList::toString() to obtain a string representation of all transactions in the transaction list
Step 3: The string representation is forwarded to UI::printResponse to show it to the user
Step 4: Lastly, executeCommand returns false to indicate that this is a non-terminating command
The following sequence diagram shows how the view user operation works:
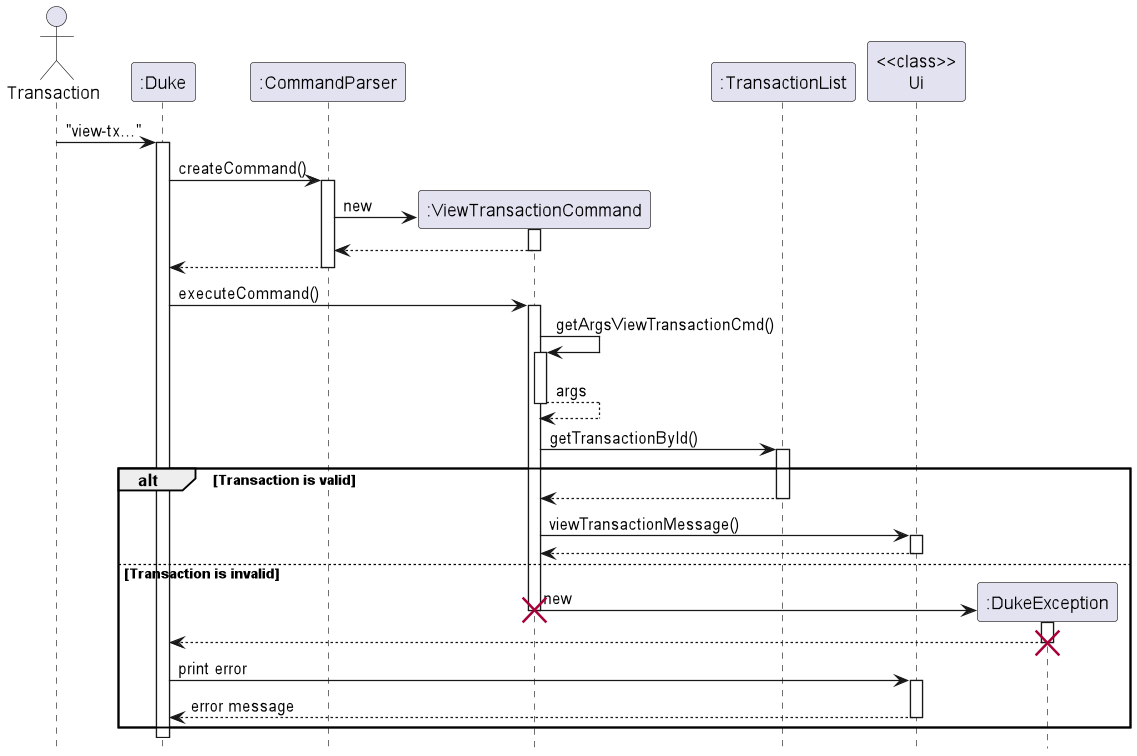
4.3.4. View a transaction
This feature allows the user to view a specific transaction in the transaction list. Upon successfully sending the command, the Ui will display the details of the searched transaction
Given below is an example usage scenario and how the command mechanism behaves at each step.
Step 1: The user types in the command in the command line. The CommandParser class checks if the command is valid through the createCommand() method, and either sends an exception, or send the input to the ViewTransactionCommand class to be processed.
Step 2: The ViewTransactionCommand command checks if the delimiters (‘u’) is present in the user input through the getArgsViewTransactionCmd() method. If not present, an exception will be thrown. The command also checks whether the input’s final argument is valid (transaction can be found or not) by checking whether that transaction is currently in the transaction list via the isValidTransaction method. An exception will also be thrown if the final argument does not satisfy the requirements (transaction not found).
Step 3: If all arguments are valid, then it finds the transaction in the transactionList by transactionId, which is unique:
transactionList.getTransactionById(transactionId)
Step 4: After finding the transaction, a message will be displayed to the user via Ui.viewTransactionMessage() method which show the specified transaction’s details.
The following sequence diagram shows how the view transaction operation works:
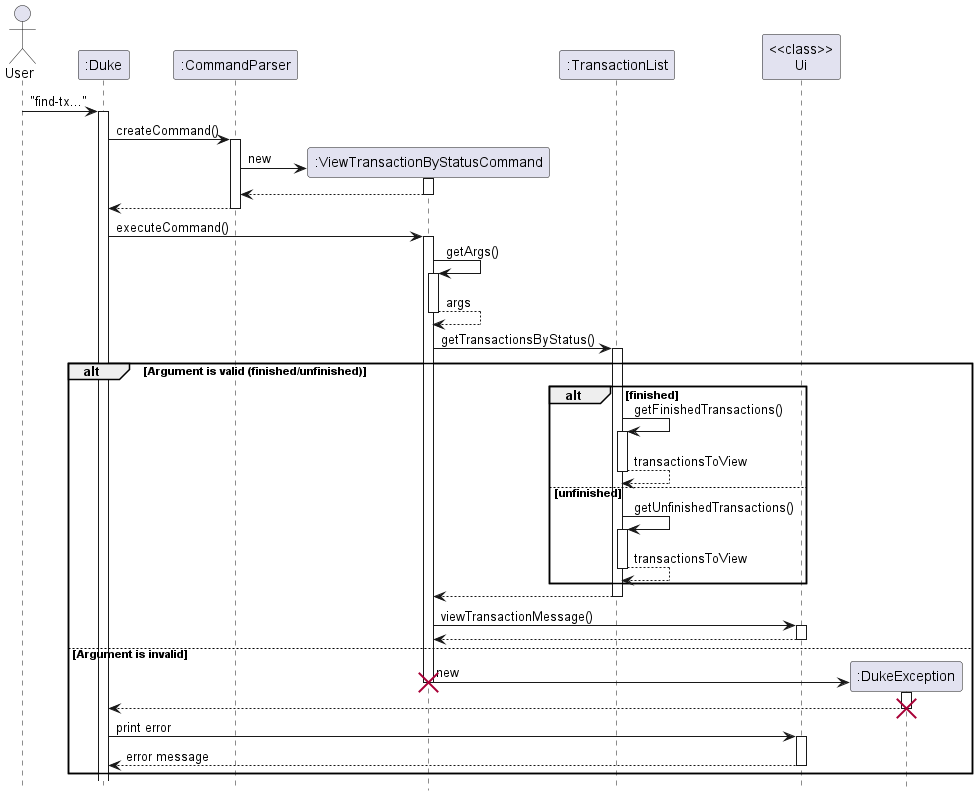
4.3.5. Find Transactions By Status
The viewTransactionsByStatus feature is facilitated by the TransactionList class. It extends the command class to add a command for users to view the history of finished or ongoing transactions for recording purposes. The feature implements the following commands:
find-tx /s finished: Lists down all the transactions that have been completed.find-tx /s unfinished: Lists down all the transactions that are currently still ongoing.
Given below is an example usage scenario and how the command mechanism behaves at each step.
Step 1: The user types in the command in the command line. The CommandParser class checks if the command is valid through the createCommand() method, and either sends an exception, or send the input to the ViewTransactionsByStatus command to be processed.
Step 2: The ViewTransactionsByStatus command checks if the delimiter (‘s’) is present in the user input through the getArgs() method. If not present, an exception will be thrown. The command also checks whether the input’s final argument is ‘finished’ or ‘unfinished’ through the isValidArgument() method. An exception will also be thrown if the final argument does not match the required words.
Step 3: Assuming the final argument is ‘finish’, the entire transactionList will be iterated through, and an array will store the transaction if the transaction.isFinished() status is true.
Step 4: Once the transactionList has been completely iterated through, a message will be displayed to the user via Ui.viewcompletedTransactionsMessage() which lists down all the transactions that have their isFinished() status set to true.
The following sequence diagram shows how the viewTransactionsByStatus operation works:
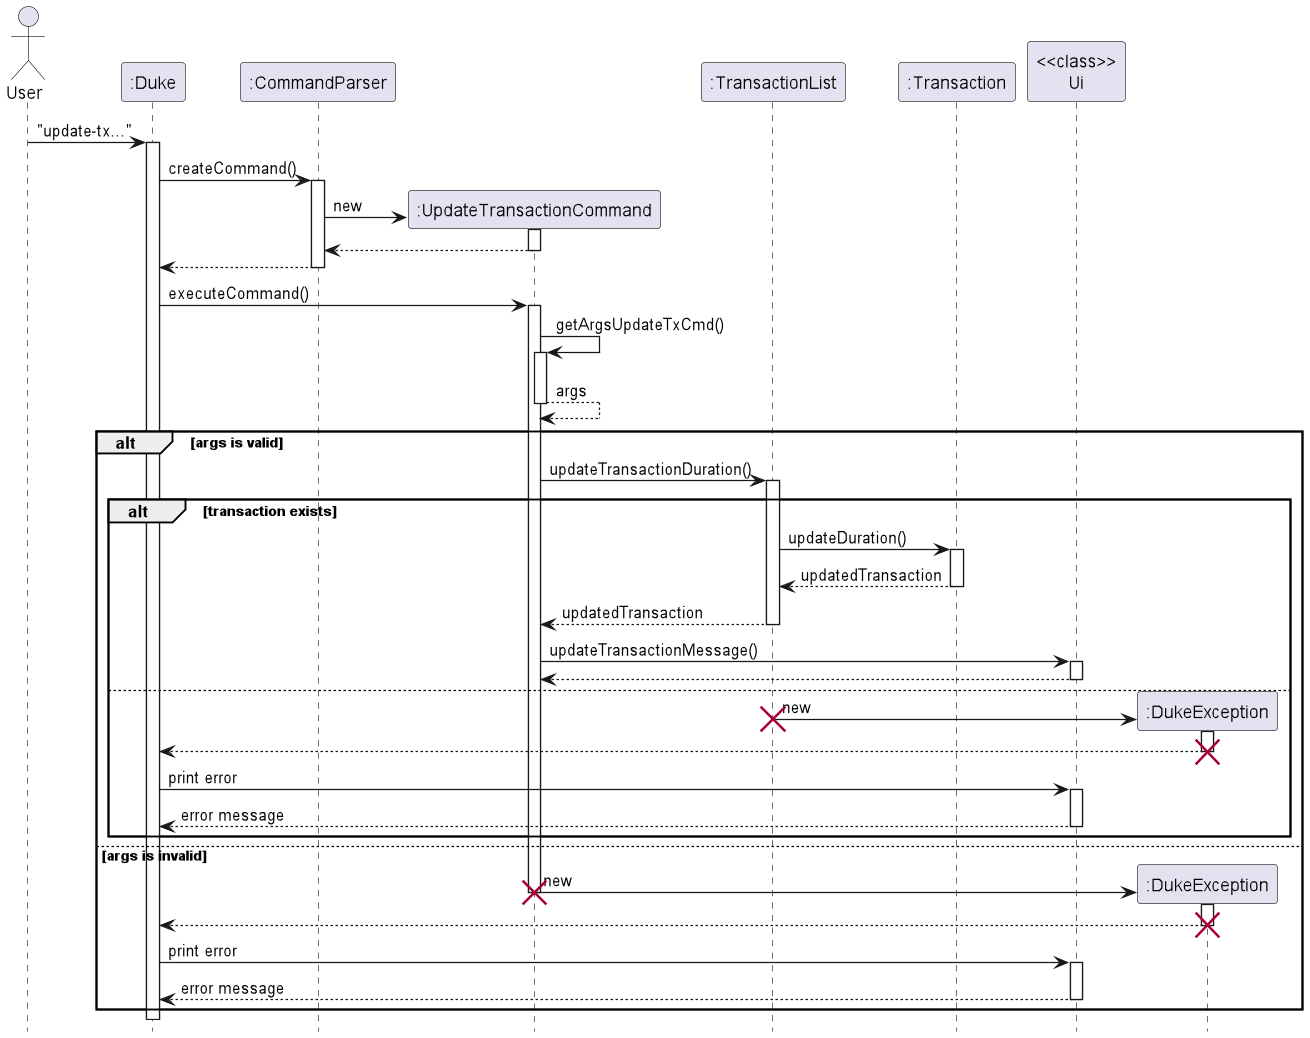
4.3.6. Update an transaction
This feature allows the user to update a specific item in the item list
Given below is an example usage scenario and how the command mechanism behaves at each step.
Step 1: The user types in the command in the command line. The CommandParser class checks if the command is valid through the createCommand() method, and either throws an exception, or forwards the input to UpdateTransactionCommand class to be processed.
Step 2: UpdateTransactionCommand::executeCommand checks if the delimiters (‘t’, ‘d’) is present in the user input with the getArgsViewItemCmd() method. If any arguments are not present, an exception will be thrown.
Step 3: If all commands are present, it then checks if arguments are valid with UpdateTransactionCommand::areValidArgs . An exception will also be thrown if the final argument does not satisfy the requirements (transaction not found or duration not valid).
Step 4: If all arguments are valid, it then delegates to TransactionList::updateTransactionDuration which finds the transaction in the list by transactionId, which is unique and calls Transaction::updateDuration, which returns a Transaction with updated duration
Step 5: TransactionList then updates itself with the latest item and returns
Step 6: Lastly, information about the updated transaction is printed to the user
The following sequence diagram models the operation:
4.4. Help Command
This feature allows users to see all the commands and command formats required by Upcycle
Usage is very simple, and is prompted when the user first opens the Upcycle application.
Step 1: Type help in the command line. A list of all relevant commands are displayed for the user’s reference.
4.5. Exit Command
This feature allows users to exit the program, and they will receive goodbye message after executing the command
bye.
Given below is an example usage scenario and how the command mechanism behaves at each step.
Step 1: The user types in the command bye in the command line. The CommandParser class checks if the command is valid through the createCommand() method.
Step 2: Duke will receive the ExitCommand and execute it.
Step 3: Since there is no parameter to check for exit command, it will execute directly by calling Ui.printExitMessage()
Step 4: The executeCommand() of ExitCommand returns true, so Duke will recognize this command is isLastCommand and exit the while loop and stop the program.
5. Product scope
5.1. Target user profile
- Student at NUS
- Reasonably comfortable using CLI
- Student staying on campus
- Has a passion to serve the student community
- Student who wants to host a rental business for his/her hall
- Student who wants to help others borrow or loan items
- Someone who would like to track the gains and losses of each person in the community
5.2. Value proposition
Upcycle is a Database Management System that aims to promote frugality and sustainability by providing service for students staying in a particular community/hall to lend or borrow items they wish to share with their community.
6. User Stories
| Version | As a … | I want to … | So that I can … |
|---|---|---|---|
| v1.0 | new user | see usage instructions | refer to them when I forget how to use the application |
| v1.0 | manager | add a user | he/she may borrow and lend items |
| v1.0 | manager | view a specific user | know what items he/she is borrowing and lending |
| v1.0 | manager | view all users | see who are available for lending and borrowing |
| v1.0 | manager | delete a user | remove the user if he violates community guidelines |
| v1.0 | manager | add an item | make the item available for lend |
| v1.0 | manager | delete an item | remove the item when a user decides not to lend it |
| v1.0 | manager | view a specific item | know what the details of the item like itemID and price |
| v1.0 | manager | view all items | see what items are available/unavailable for lend |
| v1.0 | manager | create a transaction | keep a record of that transaction |
| v1.0 | manager | view a specific transaction | keep track of the status of the transaction |
| v1.0 | manager | delete a transaction | remove transaction when users change their mind |
| v2.0 | manager | find a item by keyword | locate an item without going through the list |
| v2.0 | manager | find a user by keyword | locate a user without going through the list |
| v2.0 | manager | view transactions by status | view the transactions that are finished or not finished |
| v2.0 | manager | sort items | view items based on its price and categories |
| v2.0 | manager | update price | change the price a user decides to lend his item for |
| v2.0 | manager | update transaction | change the number of days a user decides to lend his item for |
| v2.0 | manager | store my database | maintain the database without losing my data |
| v2.0 | manager | view a user’s items | view the items that belong to a user |
| v2.1 | manager | view a user’s borrow transactions | view the transactions in which a user is a borrower |
| v2.1 | manager | view a user’s lend transactions | view the transactions in which a user is a lender |
| v2.1 | manager | view a user’s loss | see how much a user has to pay for the items he has borrowed |
| v2.1 | manager | view a user’s gain | see how much a user has earned for items he has lent |
7. Non-Functional Requirements
- Should work on any mainstream OS as long as it has Java 11 or above installed.
- A user with above average typing speed for regular English text (i.e. not code, not system admin commands) should be able to accomplish most of the tasks faster using commands than using the mouse.
- Should work for only one user.
- Should work without Internet connection.
8. Glossary
| Term | Definition |
|---|---|
| tx | Transaction |
| UI | User Interface |
| Mainstream OS | Windows, Linux, Unix, OS-X |
| CLI | Command Line Interface |
9. Instructions for manual testing
This section provides guidance to the tester to manually test Upcycle by providing some test inputs the tester can enter into the app.
There are 2 categories of test cases:
- Positive test cases: follow the user guide in the sequence from 3.1 to 3.5
- Negative test cases: listed below
Here are the negative test cases you can test:
- Invalid general commands:
- Empty command: ` `
- Not supported command:
cap 5.0
- Invalid User-related features:
- Invalid
usercommands:- Missing user prefix:
user - Wrong user prefix:
destroy-user
- Missing user prefix:
- Invalid
add-usercommands:- Missing all command arguments:
add-user - Missing some command arguments (e.g. contact number not added):
add-user /n bui /a 20 /c - Invalid age:
add-user /n bui /a twenty /c 91234567 - Invalid contact (length must be 8):
add-user /n yixiang /a 20 /c 1234567 - Invalid contact (only contains digits 0-9):
add-user /n yixiang /a 20 /c -1234567 - Invalid age:
add-user /n yixiang /a 9 /c 12345678(age out of range 10-10000)
- Missing all command arguments:
- Invalid
remove-usercommands:- Invalid userName:
remove-user /u tate(tate does not exist) - Missing command arguments:
remove-user
- Invalid userName:
- Invalid
view-user/view-user-items/view-user-loss/view-user-gaincommands:- Invalid userName (tate does not exist):
view-user /u tateview-user-items /u tateview-user-loss /u tateview-user-gain /u tate
- Invalid userName (tate does not exist):
- Invalid
find-usercommands:- Missing keyword:
find-user /k
- Missing keyword:
- Invalid
view-borrow-tx-by-user/view-lend-tx-by-usercommands:- Invalid username:
view-borrow-tx-by-user /u tate(tate does not exist) - Invalid username:
view-lend-tx-by-user /u tate(tate does not exist)
- Invalid username:
- Invalid
- Invalid Item-related feature:
- Invalid
itemcommands:- Missing item prefix:
item - Wrong item prefix:
destroy-item
- Missing item prefix:
- Invalid
add-itemcommands:- Invalid category:
add-item /n khdsa982 /c 21 /p 3.5 /o bui - Invalid owner:
add-item /n khdsa982 /c 3 /p 3.5 /o tate(tate does not exist) - Invalid price:
add-item /n khdsa982 /c 3 /p -1 /o bui
- Invalid category:
- Invalid
remove-itemcommands:- Invalid item ID:
remove-item /i 1234567(ID 1234567 does not exist)
- Invalid item ID:
- Invalid
view-itemcommands:- Invalid item ID:
view-item /i 1234567(ID 1234567 does not exist)
- Invalid item ID:
- Invalid
update-itemcommands:- Invalid item ID:
update-item /i 1234567 /p 2.3(ID 1234567 does not exist) - Invalid price:
update-item /i 99995bb2 /p -2.0
- Invalid item ID:
- Invalid
sort-itemscommands:- Invalid sort mode:
sort-items /mode medium - Invalid price:
sort-items /mode lh /min -2.1 - Invalid price boundaries:
sort-items /min 10 /max 1 - Invalid category number:
sort-items /cat 21
- Invalid sort mode:
- Invalid
find-itemcommands:- Missing keyword:
find-item /k
- Missing keyword:
- Invalid
- Invalid Transaction-related commands:
- Invalid
add-txcommands:- Invalid item ID:
add-tx /i 1234567 /b winston /d 2 /c 2022-10-28(ID 1234567 does not exist) - Invalid borrower:
add-tx /i 99995bb2 /b tate /d 2 /c 2022-10-28 - Invalid duration:
add-tx /i 99995bb2 /b winston /d 1462 /c 2022-10-28(duration must be less than 1461) - Invalid created date:
add-tx /i 99995bb2 /b winston /d 2 /c 28-10-2022
- Invalid item ID:
- Invalid
remove-txcommands:- Invalid transaction ID:
remove-tx /t 1234567(ID 1234567 does not exist)
- Invalid transaction ID:
- Invalid
view-txcommands:- Invalid transaction ID:
view-tx /t 1234567(ID 1234567 does not exist)
- Invalid transaction ID:
- Invalid
find-txcommands:- Invalid status:
find-tx /s ended
- Invalid status:
- Invalid
update-txcommands:- Invalid transaction ID:
update-tx /t 1234567 /d 3(ID 1234567 does not exist) - Invalid duration:
update-tx /t 99995bb2 /d -5
- Invalid transaction ID:
- Invalid